
Seaming Garter Stitch Fabric
using Mattress Stitch
For the Demilune Top (and most other projects in garter stitch that require seaming!)
Garter Stitch
Row 1: Knit all stitches.
Repeat Row 1 to make pattern.
Garter stitch. It’s usually the first stitch we learn as new knitters. You remember… that first rectangular scarf that many of us tackled as our first project.. the one with it’s charming dropped stitches and affable yarn over holes. Ah Garter stitch. We so quickly abandoned and replaced you with your smoother, more “refined” older sibling, stockinette stitch.
But Garter stitch has so many great attributes that shouldn’t be forgotten so fast! It lays nice and flat, with no curling edges, is completely reversible, and it has that three-dimensional squishy quality that really makes it a supremely cozy stitch.
Back in 2016, I designed the Festival halter Top for the book Garter Stitch Revival (now out of print) published by Interweave. I thought it was a really awesome concept for a book, showcasing 20 designs that all celebrate the awesomeness and versatility of knitting’s most simplest stitch - Garter Stitch! I had always intended to re-publish my design, and I did eventually get around to it with a new and improved version, the Demilune Top. Basically, it is the same design, but with an extended size range, updated yarn choice and improved shaping. You can find the pattern in my Ravelry or Payhip store.

Left: © Interweave, F+W Media Inc. Right: Wyatt Clough
Personally, I find it quite relaxing to mindlessly knit every row without having to purl, which is why I think projects knit circularly in the round are probably as popular as they are. It can be a very meditative process to just knit and knit and knit! Something to keep in mind that often confuses the new knitter, is that Garter stitch only appears as Garter stitch when it is knit flat, and not circularly. As soon as you join work in the round, in order to achieve Garter stitch, you have to knit one round, and then purl the next round. As you progress as a knitter and begin to understand the mechanics of knitting, it soon becomes clear why this happens so I will not explain it here, but knitting flat pieces in Garter stitch is what has lead me to write this tutorial.
Of course, when knitting a garment in flat pieces (rather than in the round), we usually find ourselves in need of some seaming to get everything into one, wearable piece. I hear a lot of knitters let out a big groan when the prospect of seaming comes up, but I will be totally honest, I am a big advocate for seaming knitted garments as opposed to knitting sweaters and cardigans in the round. For myself, after I’ve put in all the time and patience into a knitting project, my hope is that my efforts will pay off and my finished garment will last me for many wears. Knitting is inherently stretchy and seams can help to add that little extra bit of stability and structure to keep everything in nice shape :)
Ok, below is the method I use to make mattress stitch on Garter stitch fabric! I’ll show you how I do it…
TUTORIAL BEGINS
You Will Need:
A project knit primarily in Garter stitch (such as the Demilune top), ready to be seamed together (I will be using two square Garter stitch swatches knit in worsted weight wool for this tutorial)
A tapestry needle or yarn needle
Extra matching yarn for making the seam (for this tutorial, I am using a contrasting colour yarn for visibility purposes, but for your actual project, matching is recommended!)

You will be working with the RIGHT SIDE of your knitting facing you. If preferred, and if your leftover cast on tail is long enough, you can choose to thread your needle onto the tail and use that to make the seam which will save you weaving in a tail later! For this tutorial, I will use a separate length of yarn. FYI: Your finished seam on Garter stitch might feel a bit less bulky than a seam using mattress stitch on stockinette fabric and this is due to that fact that your finished selvages will be one full stitch in from the edge on the left-hand piece, and only half a stitch in from the edge of the right-hand piece.

First, let’s identify the stitches in your work that we will be picking up with the tapestry needle to work the seam. On your left-hand piece, identify the first column of stitches on the right edge of the piece. Between that first stitch column and the second stitch column are lower bars, which I’ve hi-lited in green and appear as “smiles”. On your right-hand piece, identify the first column of stitches on the left edge of the piece. The first stitch column has upper bars, which i’ve hi-lited in purple and appear as “frowns”.

Locate the first “smile” between that first stitch column and the second stitch column at the bottom edge of your left-hand piece. With your threaded tapestry needle, pick up that smile (1) and pull the yarn through. On your right-hand piece, locate the first corresponding “frown” (2).

Pick up frown (2) with your tapestry needle, and pull the yarn through. Locate the next smile (3) on your left-hand piece.


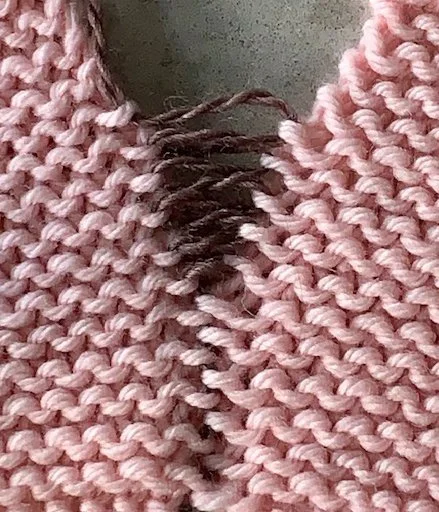
Continue in this manner, picking up the corresponding “smiles” and “frowns” with your tapestry needle and pulling yarn through.
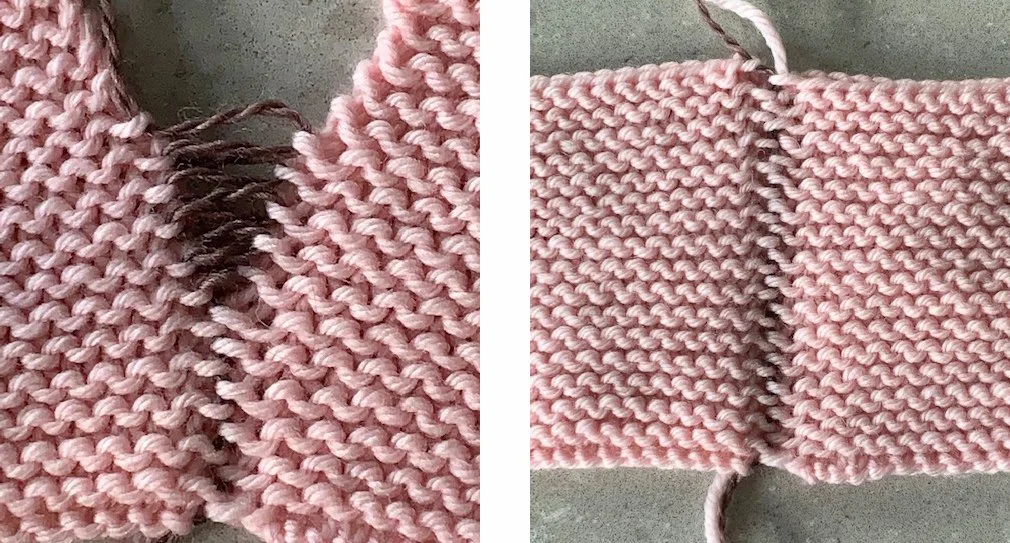
After your seam is a couple of inches long, you can pull the threaded yarn snugly to close up the seam. Don’t pull the yarn too tightly, but just enough so that the seam is stable yet still maintains some elasticity. Since I used a contrasting coloured yarn to seam, you are still able to see it through the seam, which is why it is best to use a matching colour if possible!

If you flip your work over to the wrong side, you will notice the one and half stitch seam selvedge I mentioned above. It is a nice thing to have a less bulky seam, however if you’d prefer a seam that is more thick and firm, you could pick up the next column of “frowns” on the right-hand piece, one and a half stitches in from the edge instead.
Hope you found this tutorial helpful!
Happy knitting!
~ Sachiko
